Tuesday, December 13, 2011

Busy Busy Busy!

So it's been awhile since i've shared anything with you on this blog and it looks like it may be a little while longer before anything new gets finished. I am working on a couple projects right now, but they are definitely taking a back burner to everything else. Life is crazy right now with the Holidays! Add in some sickness in the family and there just isn't enough time in the day to work on my projects.

I did want to share the news about an exciting new ebook that just came out. I blog stalk quite a few other furniture refinishing blogs out there and 2 of my favorites decided to work together to put out a "Guide to Furniture Refinishing" ebook. These people know what they are talking about. They have been doing this for years and use all the professional equipment. I've had several people ask me about what I do or how to redo furniture. I am not a professional and am still figuring things out as I go. So I thought I'd pass along this link in case anyone decides they'd like to learn about it themselves. They just released it to early subscribers like myself, but will be releasing it to the public within the next few days I think. Here is the link if you'd like to take a look:
www.europaintfinishes.blogspot.com

I'd suggest taking a look at some of their past posts. You will be amazed at some of their furniture. They do awesome work!

Hope everyone is having a great Holiday Season!

Tuesday, November 29, 2011

1920's Art Deco Bed

So this is gonna be a challenge!
I found a lady basically giving this bed away because of it's condition. She had left it in her barn during the summer and you can guess what happened. The heat did some work on it. The veneer on top separated and splintered all over it.

She said if nobody wanted it she was going to just throw it away. I just couldn't let her do that. Just look at it! It's beautiful! Well, it could be beautiful. Just look at the curved footboard and the cute little feet on it. And I loved the scroll detail on it.


Okay....so it looks horrible right now. I know. But I am going to try my best to fix her up and make her beautiful once more.
Wish me luck!!

Thursday, November 24, 2011

Round and Round

**********SOLD**********

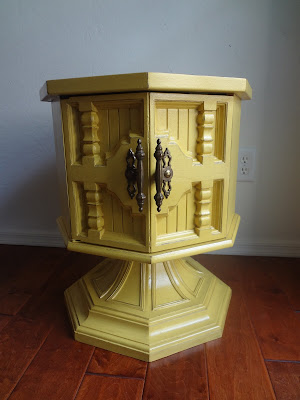
Mustard Yellow Vintage Side Table
This was a fun piece to work on as it was a little unique. Other than the intricate scroll design on the top, the top half of the table spins around. Not sure how much more useful it makes the piece, but it added an interesting vintage element to it for me.
I loved the old hardware on the doors and of course the design on the top. It looks like it may have had a glass piece on top at one point to make the surface flat for use.
I think it turned out beautifully with the bold mustard yellow color. I distressed it and antiqued it to deepen the color. This is also for sale so if you are interested let me know!


Friday, November 18, 2011

Turquoise Vintage Coffee Table

********SOLD*********

It's finally done! Hooray!
This one was definitely more of a challenge but it turned out great. I love the color and the top stained beautifully. Sometimes with these old pieces they don't have great wood grain on top but this one shows thru wonderfully. I gave it a light distressing and antiqued it with a dark glaze.
It's got a fun cabinet for storage in the middle and great detail on the doors. Everything was sealed with a poly finish for protection.
Pictures don't do it justice. This one is for sale so if you are interested in it, let me know! It measures 2 feet wide, 5 feet long, and 20.5 inches tall.


Tuesday, November 15, 2011

It's almost done!

Call me slow or call me lazy. I'd prefer perfectionist.
This project seemed to take longer than I thought it should, but things kept coming up that would delay me getting it done. Mostly family stuff, but the occasional hiccup in the painting or staining would arise that would set me back a little.
I already know I'm going to sell this coffee table and I would hate to sell anything I didn't feel I did my best on. Or that I would be proud to put in my own home. So when minor things came up I wanted to make sure they were addressed right. So I took my time. And I'm glad I did. It turned out beautifully. I just finished putting the lacquer on it this morning so it will need a day or two to set but pictures are coming.
Here is a sneak peak:
Sorry for the ugly background of my garage, but I don't dare bring it inside until the lacquer sets for fear my kids will do something to it!

Tuesday, November 8, 2011

Antique China Hutch

Isn't she pretty......


I found her for sale on Craigslist and it was love at first sight. I knew I had to have her. She is probably almost 100 years old and so delicate.
It might be awhile before I can decide what I want to do with her. She's so pretty and I want to make sure I pick the best way to paint her up. Plus, she's in such good condition that I almost feel bad about putting any paint on her. She might have to stay like this for awhile.
And yes, I realize I am calling the hutch a she. It just felt right. :)

Thursday, November 3, 2011

Another Vintage Coffee Table - For Sale!

Remember this.......

Imagine my surprise when I walked into the thrift store and found this:


It is very similar to the first one I did and made by the same company. It has a few more spindles on the sides and the design is a little different on the doors. It was in great shape and I was so excited to take it home and get started. I was so excited, that I sanded down the top before I even thought about taking a picture!


I have had quite a few people ask me about the first one I did and if I would sell it.
Well, this new one will be for sale. I am thinking about painting it the same antique turquoise I did the first one based on the response I got on it.
Unless, one of you out there wants it and needs a different color! If you think you might want to purchase this from me let me know and I can customize the color for you. The top will be stained and I will add feet onto it like I did the first one. If you scroll down to the post about the first coffee table you can see better pictures of what the finished product will look similar too.


Wednesday, October 26, 2011

Mustard Yellow Table

Can I just say that I love this table. It turned out exactly as I had envisioned it would when I first bought it. I immediately knew this table was destined to be mustard yellow. I have been seeing so many cute pieces redone in that color and couldn't wait to try my hand at it.
I love the lines on this piece and the subtle details. The top and the middle panels of the doors were stained a dark walnut and then sanded down to give them a more distressed look. I then added the little decorative scrolls on the side panels. I went back and forth about replacing the hardware, but in the end I thought keeping the original pull looked great.
I have the perfect spot for this in my entryway and am loving the new addition!

Before:


After:


Tuesday, October 25, 2011

a little peek....

So I am just about done with another project but it needs another day to let the lacquer set before I can bring her inside. I will be posting full pictures either tomorrow or the next day. For now here's a little sneak peek at what she looks like.....

Friday, October 14, 2011

Victorian Dining Table

******SOLD******

So once again I completely forgot to take a decent before picture. I need to get better about that since it's the most exciting part about refinishing! I love to look back and see the huge change something went through.

This was a very old, antique dining set I found out shopping one day. I love the details on the chairs and the scalloped skirt around the table. The top was re-stained a dark walnut color. The base and the chairs were painted an antique white, distressed, and glazed.

Let me just say, a lot of work went into this project. The table went pretty smoothly. I did have to do 4 coats of lacquer on the top which took some time. I wanted to make sure it would hold up well! The chairs were exhausting to do! The fun details on the chairs soon turned into longer hours of painting nooks and crannies and distressing edges and grooves.

In the end it turned out beautifully and exactly as I had hoped. I don't think I will be taking on another dining set for quite awhile though!

Before:


After:


I am going to sell this dining set because we have 3 kids and it only has room for 4 chairs. I really hate to part with it though. It has all the seat cushions, they just need to be recovered. It also has a leaf with it that would allow it to seat 6.
If you are interested in it let me know.

Monday, September 26, 2011

Vintage Coffee Table

So I found this table listed on Craigslist. I've been wanting to redo something for a little while now and would love a new coffee table. This seemed destined to be mine.
Here is the before shot:


And here is the after:


Amazing what a little paint and stain can do right?!
I was a little nervous about the color at first. When I put the first coat on, it was bright. Like Island Blue bright. Not what I was going for. I was tempted to run to the store that night and get another color. I had the keys in my hand. Fortunately, I reasoned with myself that after antiquing it with glaze it would be the deeper turquoise I was going for. Please Please Please, turn out the way I want you to.
Amazingly it did. Whew. I felt lucky. There are a million shade of paint colors at the store and I totally thought I'd picked the wrong one.
I also decided it needed some feet. I didn't like it sitting on the ground.
What do you think? Don't you just love the detail on the doors?!

Shabby Chic Side Table

I love the way this cute little table turned out. I am kicking myself that I didn't take a picture of it before I started the redo. Just picture an old yucky brown color. I loved all the little spindle legs on it and thought it looked perfect for an antique white color. It was stained on top, distressed and then glazed to give it more of that antique shabby chic look.